Choosing the Right Lighting for Glassware Displays

Are you tired of your collection looking dull or, even worse, looking like a cluttered mess under harsh overhead lights? This guide covers the technical aspects of lighting for glass-based collectibles—including shot glasses, decanters, and small bottles—to help you highlight color, texture, and clarity without causing damage. Proper lighting isn't just about visibility; it's about protecting the integrity of your pieces while making them pop.
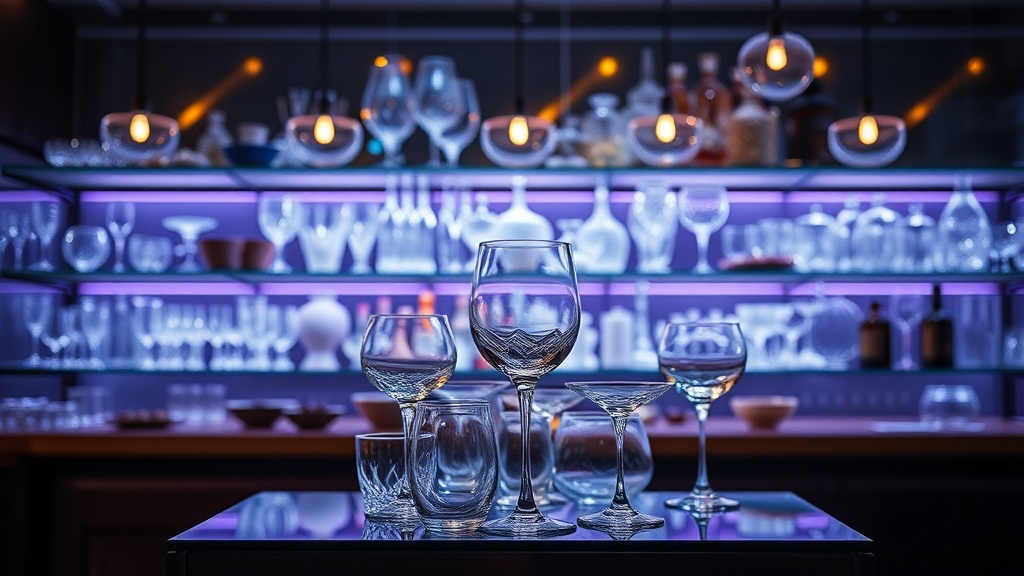
What Kind of Light is Best for Glassware?
LED (Light Emitting Diode) lighting is the best option for displaying glass collections because it produces minimal heat and lacks UV radiation. Most collectors worry about heat-related damage, and that's a valid concern. Traditional incandescent bulbs get hot enough to expand glass or even melt certain plastic components in caps and small collectibles. LEDs stay cool to the touch, which is a massive relief when you're displaying items in a tight, enclosed cabinet.
The main reason to stick with LEDs is the spectrum. If you have a collection of vintage colored glass or high-end crystal, you want to see the true color without the light washing it out. LEDs allow you to control the "temperature" of the light. You'll want to look at the Kelvin (K) rating to decide the vibe of your display.
- 2700K - 3000K (Warm White): Great for amber glass, heavy decanters, or vintage wood-themed collections. It feels cozy and traditional.
- 4000K (Neutral White): This is the sweet spot for most collectors. It looks clean and doesn't distort the colors of your shot glasses or colorful caps.
- 5000K+ (Cool Daylight): Use this if you want to highlight the crispness of clear glass or silver-toned metals. Be careful, though—too much blue light can make things look clinical and "cheap."
One thing to keep in mind: light-induced fading. If you have printed graphics on your shot glasses or colorful plastic caps, constant exposure to high-intensity light can cause pigments to break down. (It’s a slow process, but it happens.)
How Do I Prevent Damage from Light?
The best way to prevent damage is to use light sources that do not emit UV rays and to keep your displays out of direct sunlight. UV radiation is the enemy of any collector. It doesn't just fade the colors on a printed shot glass; it can actually degrade the structural integrity of certain types of vintage plastics and resins. If your collection sits near a window, you're asking for trouble.
To protect your items, you can use UV-filtering film on your windows or invest in display cases that are specifically rated for UV protection. If you're using high-end museum-grade cases, you're already ahead of the game. But for most of us, a simple rule of thumb works: if the light feels hot to your hand, it's too much light for your collection. Heat and light are a bad combination for delicate glass.
It’s also worth noting that light can actually highlight dust. If your lighting is too direct or too bright, every speck of dust on your bottles becomes a distraction. This is why a proper cleaning routine is so important before you ever turn the lights on. You want the light to hit the glass, not the grime.
Check the Wikipedia page for Light-Emitting Diodes if you want to get deep into the physics of how these work, but the takeaway is simple: LEDs are your best friend.
Which Lighting Placement Works Best for Different Items?
The placement of your light depends entirely on the shape and material of the object. A flat shot glass needs different treatment than a tall, tapered decanter or a small, intricate cap. If you place the light in the wrong spot, you'll end up with "hot spots"—areas of blinding brightness—or heavy shadows that hide the best details.
| Item Type | Best Light Placement | Goal |
|---|---|---|
| Standard Shot Glass | Front-side or slightly above | Highlight color and graphics |
| Tall Decanters/Bottles | Back-lighting or side-lighting | Show off liquid color and clarity |
| Small Caps & Smalls | Top-down (diffused) | Prevent harsh shadows |
| Textured/Etched Glass | Side-lighting (grazing) | Highlight physical texture |
For shot glasses with heavy etching or patterns, try "grazing" light. This means placing the light source at a low angle relative to the surface. This creates tiny shadows in the etchings, making the pattern pop. If the light is too direct, the etching disappears into a glare.
If you're displaying clear glass or crystal, back-lighting is your secret weapon. Placing a small light source behind the glass makes the light pass through the material, which makes the object appear to glow. This is particularly effective for high-end spirits bottles or heavy-bottomed glassware. It adds a sense of depth that front-lighting just can't match.
That said, be careful with back-lighting if your items are stacked. You don't want a bright light source sitting right behind a single piece, creating a silhouette that hides everything in front of it. You want a glow, not a blind spot.
How Much Does Display Lighting Cost?
The cost of display lighting varies wildly, ranging from $15 for basic LED strips to hundreds of dollars for professional-grade museum lighting. For most collectors, you don't need to spend a fortune to get a professional look. You can achieve incredible results using affordable, consumer-grade tools.
Here is a breakdown of common options you'll find on the market:
- LED Strips (The Budget Option): These are perfect for lining the inside edges of a shelf. They are cheap, easy to install, and come in various colors. Just ensure you buy "dimmable" versions so you can adjust the intensity.
- Puck Lights (The Mid-Range Option): These are small, circular lights that you can stick to the underside of a shelf. They are great for highlighting specific "hero" pieces in your collection.
- Spotlights (The Premium Option): These allow for precise control over where the light hits. If you have a single, very expensive piece, a small spotlight can make it the center of attention.
Don't feel like you have to outfit your entire room at once. Start with one shelf or one display case. See how the light interacts with your glass. Does it create a glare that obscures the brand name on a bottle? Does it make the colors look washed out? Adjust from there. It's a process of trial and error.
One thing to watch out for: cheap LED strips can sometimes have a "flicker" that is barely noticeable to the eye but can be distracting over time. If you're using them for a long-term display, look for high-quality strips with a stable power supply. It’s worth the extra few dollars to avoid a strobe effect in your living room.
The goal is to create an environment where the collection speaks for itself. You aren't trying to blind your guests; you're trying to invite them to look closer. Whether you're using a simple strip of lights or a complex setup, the key is balance. Too much light is a distraction; too little is a missed opportunity.